
In the world of computer security, Visual Studio Code (VS Code) extensions have emerged as a new attack vector for cybercriminals. Visual Studio Code, published by Microsoft, is a source code editor used by many professional developers around the world. Microsoft also operates an extension marketplace for the IDE, called the Visual Studio Code Marketplace, offers add-ons that extend application functionality and provide more customization options.
There are numerous reports indicating breaches in VS Code security, allowing extension spoofing, as well as extensions stealing authentication tokens from developers. Recent research by an Israeli group reveals alarming numbers, where a custom tool called 'ExtensionTotal' was developed to find high-risk extensions, unpack them and examine suspicious code snippets.
Through this process, they found the following:
• 1,283 extensions with known malicious code (229 million installations).
• 8,161 extensions communicating with encrypted IP addresses.
• 1,452 extensions using another publisher's GitHub repository, indicating that they are knockoffs.
• 2,304 extensiones que utilizan el repositorio de GitHub de otro editor, lo que indica que son imitaciones.
This article aims to replicate the development of a malicious extension to understand the associated risks, warn about its potential impact, and demonstrate an example of the techniques used to gain access and gain persistence through these extensions. We will explore how to set up a secure environment, develop the malicious extension, and finally, ensure post-exploitation persistence.
Prerequisites
To develop a malicious extension in VS Code we need to set up a suitable development environment. It should have the following elements:
• Node.js
• Visual Studio Code
• Git
• Visual Studio Code Extension Generator
Once these steps are completed, you will have a development environment set up and ready to start developing the extension.
Developing the malicious extension
With the development environment set up, the next step is to develop the malicious extension. All the code for our extension will be in the extension.ts file, which contains the code base generated by the VS Code extension creation wizard. Initially, this file includes a simple example that displays a "Hello World from color-picker!" message when the helloWorld command is invoked.
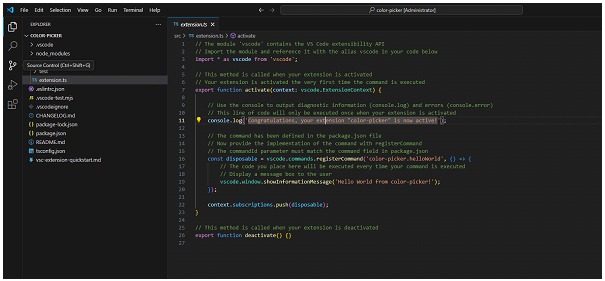
To transform this extension into a malicious tool, we will make some key modifications. The idea is to execute a reverse shell when the user invokes a specific command within VS Code. This is achieved by modifying two main files: package.json and extension.ts.
In package.json, we will configure a command that behaves like a legitimate extension, similar to a tool commonly used by developers and designers, such as a "color-picker". This configuration will allow us to execute our malicious code without arousing suspicion.

Then, in extension.ts, we will add the necessary code to execute a reverse shell. This code will be executed when the malicious command is invoked. To test that everything works correctly, we will use the VS Code debugging tools, which allow us to run and test the extension directly from the development environment.

Before implementing the malicious code, it is essential to make sure that the basic configuration of the extension works correctly. To do this, we will first test the extension with the code base provided by the wizard. This verification step is crucial because we make sure that the basics are working, otherwise we might encounter problems later on and incorrectly assume that the failure is due to the added code, when in fact it could be a problem with the initial configuration.
To perform this verification, we must run the extension with the small modifications applied. This is done from the VS Code development environment using the built-in debugging tools. We will go to the "Run" menu option and select "Start Debugging". This process will open a new instance of VS Code where we can test the extension.
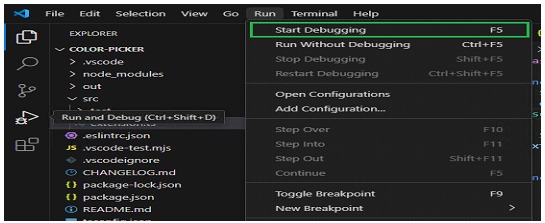
In this new instance, we will press the keyboard shortcut ctrl+shift+p to open the command palette and select our extension command. If everything works correctly, we should see the message "Hello World!" displayed in the VS Code. interface. This step confirms that the basic configuration is operational and provides a checkpoint before entering the malicious code.
Once we have verified that the basic configuration works, we can proceed to enter the reverse shell code in extension.ts and modify the default command. This code will take care of establishing a remote connection to our attacking system every time the malicious command is executed.

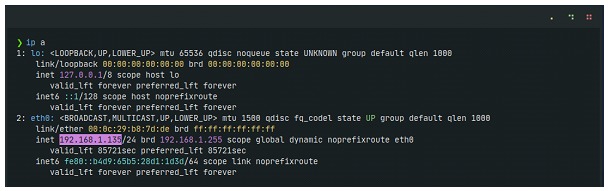
Finally, to ensure that the remote connection is successful, we will listen to our remote system (in this case, a machine with Kali Linux) and run the extension from the victim machine (Windows 11). The IP of the attacking machine is 192.168.1.135 and corresponds to our Kali on the local network that will receive the connection:
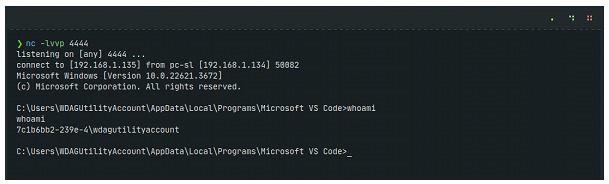
We listen to our Kali on port 4444 and run the extension again from our Windows 11 victim:

Press F5 to launch a new debug instance in VS Code. In this new instance, we use the keyboard ctrl+shift+p to open the command palette and execute the malicious extension command. Upon doing so, the connection is successfully established, allowing us to gain access to the Windows 11 system from our Kali Linux. machine. This is possible thanks to the execution of the reverse shell code we have embedded in the malicious extension, which demonstrates the effectiveness of the technique and underscores the importance of understanding and mitigating these risks in corporate environments.
Post-Exploitation and Persistence
Once we have gained access to the target system via our malicious extension, the next step is to ensure persistence and perform post-exploitation activities. This will allow us to maintain access even if the machine is rebooted and perform additional actions to further explore and compromise the system.
For post-exploitation, we will use powershell-empire, a powerful post-explotación tool that allows attackers to execute commands and scripts on compromised systems remotely. First, we configure the powershell-empire server on our attacking machine, which will allow us to manage and control the agents running on the compromised systems. On another terminal, we run the client, which we will use to interact with the server and configure our listeners and stagers.

The next step is to create a new listener in the powershell-empire. client. This listener is a component that waits for incoming connections from agents. We configure the listener with the necessary parameters, such as host and port, so that it is ready to receive connections. With the listener configured, we proceed to create a PowerShell. payload. This payload, once executed on the compromised Windows 11 system, will establish a connection back to the listener, registering itself as a new agent and allowing remote control of the system.
Now, we will proceed to create the PowerShell payload that we will run on the Windows 11 system already compromised by the malicious extension. We generate this payload by following a series of specific commands that will allow us to configure the stager that will communicate with the listener we have previously set up.
First, in the powershell-empireclient interface, we enter the main menu and select the multi/launcher stager. This stager is a versatile option that allows us to configure several parameters to establish the connection back to the listener. We configure the listener by specifying the type we have previously created, in this case, http, and set the necessary properties, such as the host and port where our listener is waiting for connections.
UOnce configured, we run the command to generate the payload. This will be a PowerShell script that, when run on the compromised Windows system, will establish a connection back to the listener and register a new agent in powershell-empire. This agent will provide us with remote control over the compromised system, allowing us to perform a wide range of post-exploitation actions.

After generating the payload, we run it on the compromised Windows 11 system, leveraging the reverse shell session we have established with our malicious extension. Upon executing the payload, we verify that the agent is correctly registered in the listener and appears in the powershell-empire client interface. This step is crucial to ensure that our configuration is correct and that the compromised system is now under our remote control.

With the agent registered and active, we can proceed to use the available post-exploitation modules to perform additional activities, ensuring that our access to the compromised system is durable and stable.

As you can see below, on the Windows 11, VS Code is not running. This is possible because, once the agent has been successfully registered through the post-exploitation framework, we no longer need to keep the editor open. Access and control over the compromised system is maintained regardless of the state of the application.

This shows that once the agent has successfully registered, it is not necessary to keep VS Code open to maintain the connection. However, it is important to note that if the machine is restarted, we will lose the connection, as the agent will not persist unless we configure a proper persistence technique.
Next, we proceed to establish persistence on the compromised system. We use the powershell_persistence_userland_registry module that allows us to set persistence in the Windows registry. This module creates an entry in the registry that will execute our payload every time the user logs in. We configure and run the persistence module, making sure that the payload runs automatically on every system restart.

We can confirm that the persistence has been successfully established when we see the message: "Registry persistence established using listener http stored in HKCU\Microsoft\Windows\CurrentVersion\Debug". This message indicates that the persistence module has been successfully created in a Windows registry entry.
This persistence technique involves storing the payload in a registry key located at HKCU:Software\Microsoft\Windows\CurrentVersion\Debug, which ensures that the PowerShell script is automatically executed every time the user logs on to the system. By setting this registration key, we ensure that the agent re-registers with the listener even after the computer is rebooted, thus maintaining remote access to the compromised system persistently.

We will try rebooting the compromised Windows to confirm persistence. Once the system has rebooted, we will check if a new agent is automatically registered in powershell-empire. This step is crucial to ensure that the implemented persistence technique is working correctly and that our remote access to the compromised system is durable.
Each time we reboot, a new agent will register, indicating that the PowerShell payload stored in the Windows registry is automatically executed at user logon, reconnecting the compromised system with our listener.

With persistence confirmed, we can start playing with some powershell-empire commands to explore and get more information from the compromised system. For example, we can use the powershell/situational_awareness/host/computerdetails module to collect system details. This module will provide us with valuable information about the hardware and software of the compromised system, including the computer name, operating system version and more.
We can perform a port scan on the network using the powershell/situational_awareness/network/portscan module. This module allows us to scan for open ports on specific devices within the compromised system's network. We configure the module to scan a particular host, for example, raspberrypi.local, and run the scan command. This type of scan helps us identify other devices and services accessible on the network, which may be potential targets for future attacks or entry points for lateral movement within the infrastructure.
These post-exploitation steps, along with persistence verification, not only allow us to maintain continuous access to the compromised system, but also to expand our knowledge and control over the environment, facilitating broader and more effective exploitation.
Conclusion
Exploring and demonstrating how to develop a malicious extension for VS Code allows us to better understand the risks associated with installing extensions and underscores the importance of security in development environments. Through environment configuration, extension development, and post-exploitation and persistence techniques, we have evidenced potential vulnerabilities that can be exploited by malicious actors.
The use of tools such as powershell-empire for post-exploitation highlights the ease with which an attacker can maintain continuous and lasting access to a compromised system, even after a reboot. The Windows registry-based persistence technique ensures that the attacker can automatically reconnect to the compromised system, making mitigation of such threats more challenging.
It is essential that developers and security professionals are aware of these attack vectors and take proactive measures to protect their environments. This includes carefully verifying installed extensions, implementing strict security policies, and using monitoring and analysis tools to detect suspicious behavior.
In summary, this exercise not only demonstrates an exploitation technique, but also highlights the need for constant vigilance and a rigorous approach to security in software development. By understanding and anticipating these threats, we can strengthen our defenses and ensure a more secure and resilient development environment.

